Problem: Visual Studio and Unity Aren’t Playing Nice!
UPDATE: This is for older setups with Visual Studio and Unity. You may want to look at Assembly Definitions.
I just started poking around in Unity 4.6 and I’ve been having a blast. I’ve made it to the point where I want to actually start hammering out some code, but I came across a bit of a problem: I want to start leveraging other projects I’ve written in my Unity solution while I’m in Visual Studio, and things are blowing up. So, what gives?
Okay, so let me start by explaining why I want to do this. I understand that if I’m making a simple game, I should have no problem breaking out my unity scripts into sub folders and organizing them to be nice and pretty. The problem I’m encountering is that I have existing projects under source control and I don’t want to copy and paste all of the code as scripts into my Unity folder. I also want to be able to create re-usable code for my future games, so I’d like to start breaking things out into libraries as I see fit.
So, if you’ve been playing around in Unity for a bit, you might say “Oh, well you’re a dummy! Unity can totally leverage your C# DLLs once you drop them into your asset folder”! And you’d be 100% correct. But that’s not the workflow I want.
The underlying problem here is this: Unity will re-write your solution and project file when you flip between Unity and Visual Studio. But I’m sure they have it that way for a reason.
The Goal: Visual Studio and Unity Should… Play Nice!
My ideal state would be something like this:
- Work in visual studio as much as I’d like to new projects to my solution, and reference them accordingly
- Flip back and forth from Unity and Visual Studio without having to reset things to compile/run again
- Build from visual studio and have things end up in the right spot… NOT copy DLLs
- Not copy+paste my entire project(s) already under source control elsewhere
Is this something that can be achieved though? I was pretty determined that I should be able to do *something* to have this working. Could I get it perfect? I wasn’t sure… But I knew I could make it better.
The Solution: Give and Take with Unity
My *almost* perfect sution, which I’ll walk you through, is this: Leveraging Visual Studio tools for Unity, modify the Unity solution as you see fit and use directory junctions (symlinks) to the build output directories of other projects.
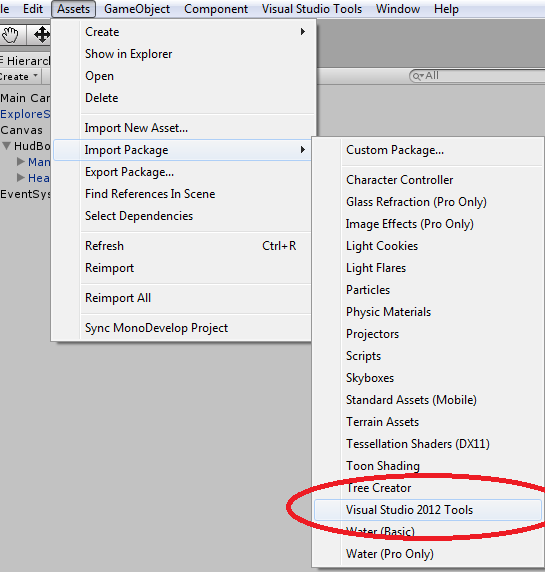
- Let’s get Visual Studio tools for Unity installed. Visit that link and download the version that you need for the version of Visual Studio that you use. After installing, I opened up my project within Unity and I had to import the Visual Studio Tools package.

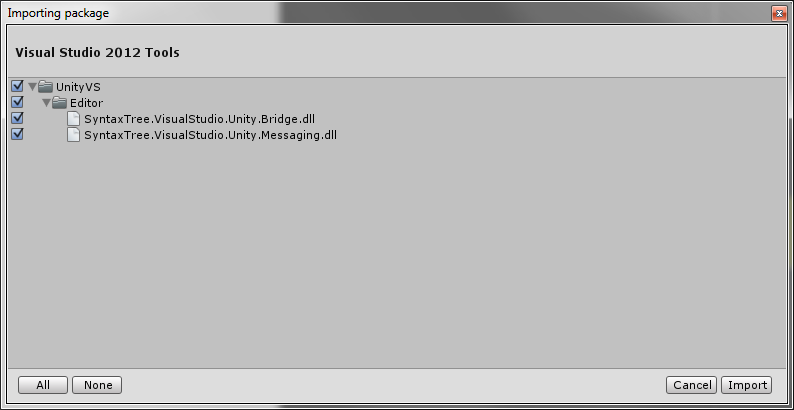
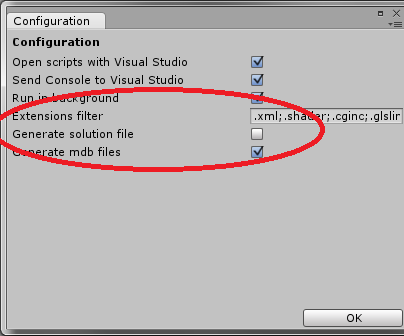
After selecting this menu item, I was presented with a dialog for picking the items to import. I left it as is. After importing these items, I could see that Unity had successfully added these entries under my Assets folder. Okay, now we’re getting somewhere. Next up, I wanted to configure Unity to not modify my solution every time I go back and forth from Unity to Visual Studio. This is the part that kills whether or not I’ve added projects to my solution. For me, it’s critical to have code I’m working on immediately accessible so that I can jump back and forth between projects. Lucky for us, this part is pretty easy. Go to the menu to access your new Visual Studio Tools menu item:
Selecting “Configuration” opens up a really simple dialog. Let’s make sure “Generate solution file” is unchecked! It’s that easy.
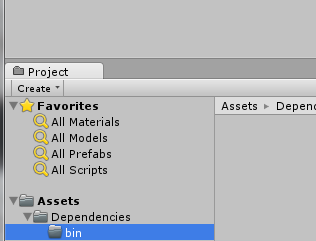
Once we have all of this setup, we should be able to go into Visual Studio and add other projects to our solution. - The one thing that I *could not* get this solution to do is have Unity leave my main game project alone in Visual Studio. As a result, the rest of this walk through is allowing us to play by Unity’s rules. Unity is good at magically referencing all of the managed DLLs that you include within your assets folder. If you drop DLLs somewhere within “Assets” and switch to Visual Studio, Unity will likely have modified your main project to reference this DLL.My next step was creating a spot where I wanted to drop the build outputs of my extra projects I wanted to reference. In my Visual Studio solution, I have my original game project and some newly added projects I want to build from source. In Unity, I wanted these to end up in “Assets/Dependencies/bin”. No problem. Let’s make that folder structure (or your equivalent if you don’t like my naming):

The next part is probably the “trickiest” part because it’s… well… unusual. You could technically stop here and manually copy DLLs back and forth, but I’m not about that life. I want things to happen automatically. For this, we’re going to use junction points. Browse to your newly created folder in an administrator command prompt. I say administrator because only certain users have permissions to create junction points. Your non-admin user might, but this is my “safe” way of instructing you. On the command prompt, we’re going to use “mklink” to create a junction. The command is “mlkink /D /J <NAME_OF_YOUR_PROJECT> <RELATIVE_PATH_TO_YOUR_PROJECT>”. For example, if you had a C# project you wanted to reference that was “MyCoolLibrary.csproj” and was located in the directory above your Unity project, you might use the command “mlkink /D /J MyCoolLibrary “……..MyCoolLibrarybindebug””. Note that I used two dots to go back up a directory several times (since we’re inside of AssetsDependenciesbin and want to get outside of our Unity project). you should get a success message when your junction is created.Repeat this step for as many extra projects as you want to include. You can always come back and add more projects this way too, or remove the junctions if you don’t want to include a project anymore.
At this point, you’re technically done. If you build from Visual Studio, you should have your other projects’ DLLs end up in your Unity folder, and your main game project will be updated by Unity to reference these now!
- But… You’re not done if you use source control for your Unity project and have separate source control on your other projects. The scary thing here is that usually we don’t want our build outputs to be stored in source control… But if we do nothing else, your source control system will likely want to include the newly created “AssetsDependenciesbin” folder and any of the contents you’re building into there. I just modified my git ignore file (I’m sure there’s an equivalent for SVN or other source control) to exclude the contents of “AssetsDependenciesbin”.The reason I didn’t excluded dependencies all together is because I can add other folders and DLL references here that I don’t want to build (like… the normal way). This gives me the flexibility of building the projects I want to control and still be able to just reference other pre-built DLLs!
Summary
In three easy steps, you should be able to use Unity, Visual Studio, and multiple projects in one solution in a what-feels-like-normal way. Because there’s still some dynamic stuff going on with Unity updating your main project, you might find the odd time you need to build twice to fix up compilation problems. I’ve seen this happen maybe once or twice so far, but otherwise it feels like normal. It’s also important to note that you can’t escape the Unity project updating… don’t add references to your main project manually. That’s what that “AssetsDependencies” folder is for that we made.
Here are a few shots of what my setup looks like (proof that it works):
And of course… it’s not the perfect solution. There’s still these things:
- Unity gets mad at you for using junctions within your project. It actually tells you not to do this because you can mess things up. It’s working awesome for me right now though… So I’m going to just ignore this warning.
- Remember step 3 where we ignored the AssetsDependenciesbin location in git? This actually ignored your junction points you created too. As a result, anyone else who clones your code will need to create junctions too. I’m working solo, so I’m not too worried about this step… But it’s definitely something that should be fixed up (again, I’m sure it’s doable, but I’m in no rush).
Hope that helps you feel more at home in Unity and Visual Studio! It certainly made it nicer for me.


You could change the output directory for your projects to avoid the junctions. Another option is a post-build event that copies the dll:s to the bin folder.
Thanks for the ideas! I found that the Unity integration with VS was always causing changes to my project files to get obliterated, so changing things like output directories or build events on the project would eventually get lost. Had you noticed that at all?
Nice info, thanks – but instead of going to the hassle of junctions, why not just add a build step to your 2nd project to do a copy?
Glad you enjoyed! A lot of the issues had to do with the fact that Unity+Visual Studio would sort of “reset” the project files (whenever it wanted to). So anything that I was modifying inside the project would actually get blown up by Unity overwriting the project file.
Nice post! Do you know if its possible to split into multiple solutions and projects with MonoDevelop instead of Visual Studios? I have a mac/linux environment and wondering if I can use monodevelop to organize my huge Unity project code base.
Thanks! Unfortunately this isn’t something I’ve tried… Sorry!
I’ve recently switched platform to pc just to be able to try this thing out and I couldn’t get my head wrapped around the basic stuff: how do you go about splitting your Unity project into multiple visual studio projects and have them included into a solution file? And did you create your own custom vs solution file or did you take the one Unity generated for you the first time? Could you please elaborate on this?
Hey Jay,
I took the one generated for me. To be honest, I’ve been out of unity for a bit but picked it up over the last couple of weeks. I think what I’ll likely end up doing is just running with two solutions, compiling one, and then copying those DLLs into the unity project.
Once I get back into it, I might try some more creative approaches.
Hey,
wonderful research, however I’m afraid it’s no longer relevant. Ever since Unity 5.2 (i think) they removed the Visual Studio Tools menu item. I cannot get into Configuration tab and check the “Generate solution file” option off. Have you found any way to do this?
Unfortunately I haven’t spent time in unity recently. If this method no longer works then hopefully someone else has a solution! I’d be interested in hearing about it.
Maybe you could put up a warning at the top of the page, so that everyone can see that there may be problems in Unity 5.2 and newer BEFORE reading your post 🙂