Unity3D Default .NET Framework
I recently wrote that I wanted to start writing more Unity3D articles because I’m starting to pick up more Unity3D hobby work. It felt like a good opportunity to share some of my learnings so that anyone searching across the web might stumble upon this and get answers to the same problems I had.
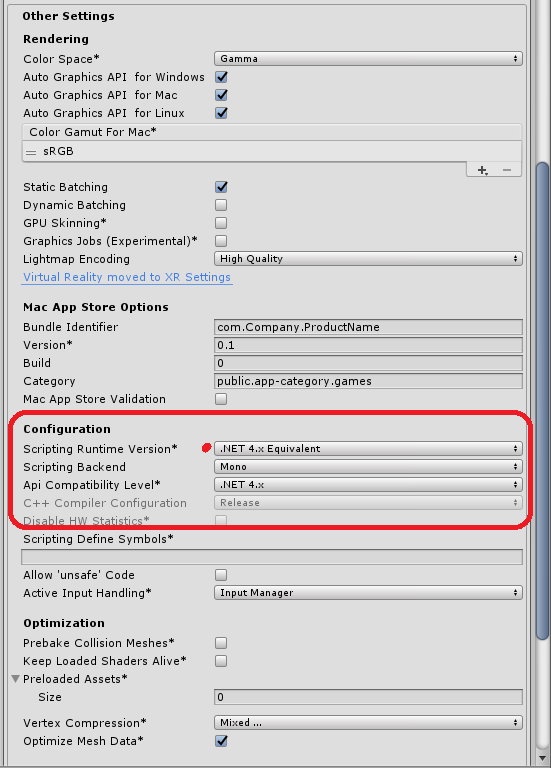
Unity3D as of 2018.1.1f1 (which is the version I’m currently using), still defaults to using .NET 3.5 as the framework version. Nothing wrong with that either. I’m sure there are reasons that they have for staying at that version, probably because of Mono and cross platform reasons if I were to guess, so I’m not complaining. For reference, this setting in Unity3D is referred to as “Scripting Runtime Version”. So if you’re googling more about this later, that’s what Unity calls it. For the libraries I was building to use as a game framework, I was using .NET 4.6 and discovered I was going to have a challenge getting them working in Unity3D.
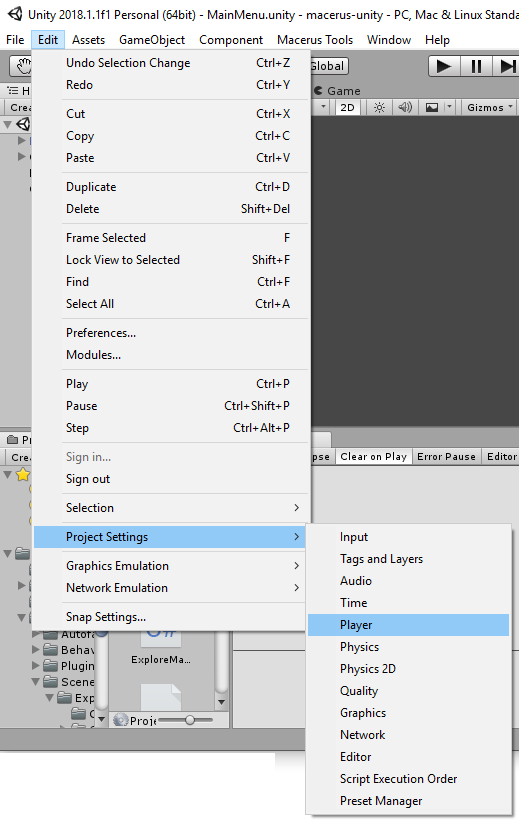
If you want to see what your setting is currently set at, you need to check out the “Player” settings. This was kind of buried in the UI for me so I didn’t know it was a thing that could be adjusted. In Unity3D 2018.1.1f1, click Edit->Project Settings->Player. Here’s what it looks like:

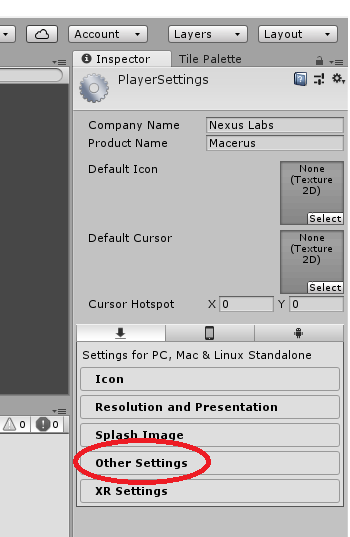
From there, you’re going to get “PlayerSettings” in your Inspector tab. You’ll need to expand the “Other Settings” to see your scripting runtime version:

Once you expand that, here’s the setting you’re interested in:

Switching Unity3D to .NET 4.x
Now that you know where the setting is… it’s pretty easy 🙂

You can read more about this setting over at the official Unity3D documentation pages:
https://docs.unity3d.com/Manual/ScriptingRuntimeUpgrade.html
This outlines what things are affected in different platforms and scenarios so YOU SHOULD READ IT to understand what will change.
Hope that makes things a bit easier for you to get up and running with .NET 4.x assemblies in Unity3D!


